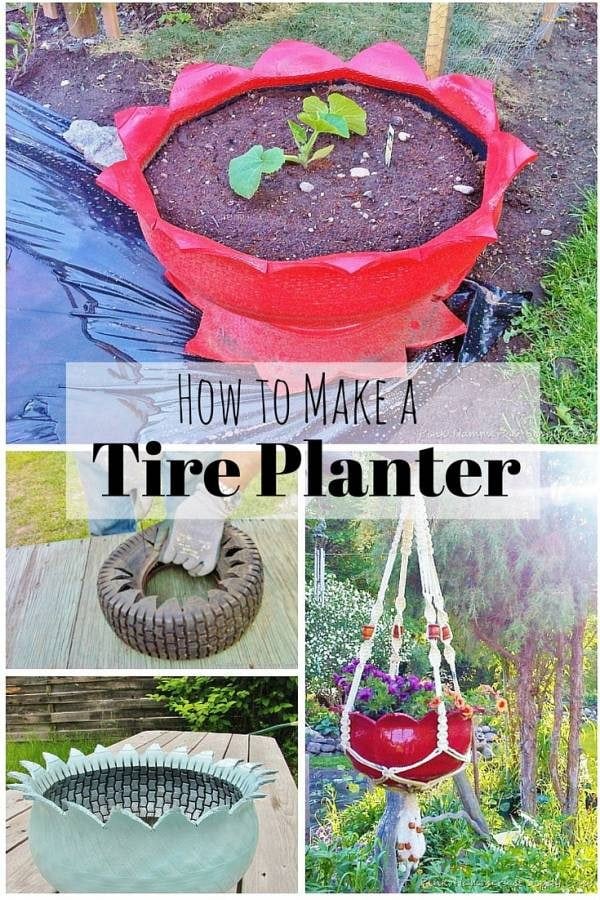
How to Make a Tire Planter Using Old Tires
Turning an old tire into a planter is one of my favorite DIY projects. It’s simple, creative, and gives you a unique way to upcycle something that would otherwise go to waste. Plus, it’s a fun way to add character to your garden or patio. Let me show you how to make one!
What You’ll Need
- An old tire: Any size works, but smaller tires are easier to handle.
- Exterior paint: Choose a vibrant color or something that blends with your garden.
- Paintbrush or roller: For painting the tire.
- Drill: To create drainage holes (optional but recommended).
- Soil: Enough to fill the planter.
- Plants: Flowers, herbs, or even small veggies.
- Plastic liner (optional): To protect the inside of the tire from soil contact.
Step 1: Clean the Tire
Before you do anything, give the tire a good scrub. Use soapy water and a brush to remove dirt, grease, or grime. Rinse it well and let it dry completely.
The first time I made a tire planter, I skipped this step, and the paint didn’t stick well. Lesson learned—cleaning makes all the difference for a smooth finish.
Step 2: Drill Drainage Holes
Flip the tire so the side you want to plant in is facing up. Use a drill to make a few holes on the bottom for drainage. This step isn’t absolutely necessary, but it helps prevent water from pooling, which keeps your plants healthy.
If you don’t have a drill, you can skip this step, but be mindful of overwatering your plants. I learned this the hard way with a soggy basil plant!
Step 3: Paint the Tire
Choose an exterior paint that’s durable and weather-resistant. Apply a base coat using a brush or roller, then add a second coat once it’s dry for a vibrant, even color.
This is the part where you can get creative! I’ve painted mine bright yellow for a sunny look and even tried polka dots on another one. If you’re working with kids, let them pick the colors—it’s a fun way to involve them.
Step 4: Add a Plastic Liner (Optional)
If you want to protect the tire from direct soil contact, line the inside with a heavy-duty plastic bag or sheet. Cut it to fit and poke a few holes in the bottom to match your drainage holes.
I usually skip the liner for outdoor planters, but it’s a great option if you’re worried about wear and tear over time.
Step 5: Fill with Soil
Once the paint is dry, place the tire in your desired location. Fill it with nutrient-rich soil, leaving about an inch of space from the top.
Pro tip: Move the tire to its final spot before adding soil—it’s much easier to relocate when it’s empty!
Step 6: Plant Your Favorites
Plant your chosen flowers, herbs, or veggies in the soil. Arrange them however you like—tall plants in the center and shorter ones around the edges work well for a balanced look. Water them thoroughly after planting.
I love using colorful flowers like petunias or marigolds in my tire planters. They pop beautifully against the painted tire and make the whole setup feel cheerful.
Tire planters are a frugal and eco-friendly way to bring life to old tires. You’ll love how easy it is to create something beautiful and functional. Give it a try and enjoy your new planter!

 Five Ideas for Affordable Window Treatments (that Actually Look Nice)
 15 Ways to Create an Expensive and Beautiful Looking Gallery Wall for Less Than $5
 DIY Light Bulb Terrarium: An Enlightening DIY Project You Can Make in Less than 5 Minutes
 DIY City Light Lampshade: Brighten up the Room with a Beautiful Skyline